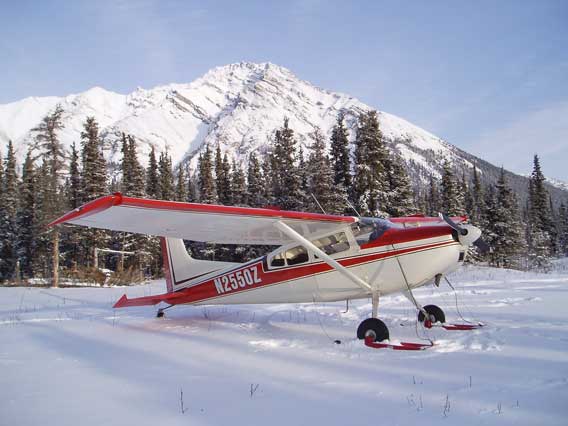
 Rohn Ck Pt Iditarod
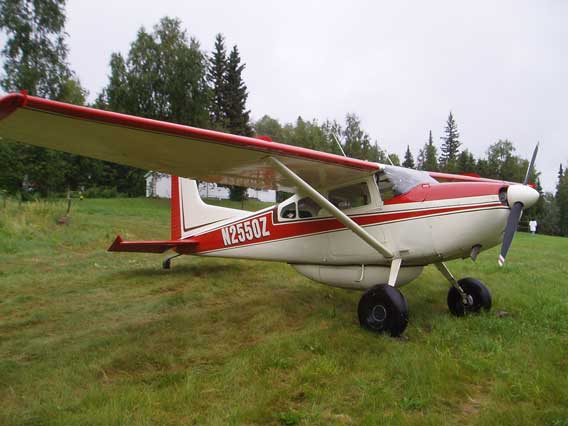 Fairbanks
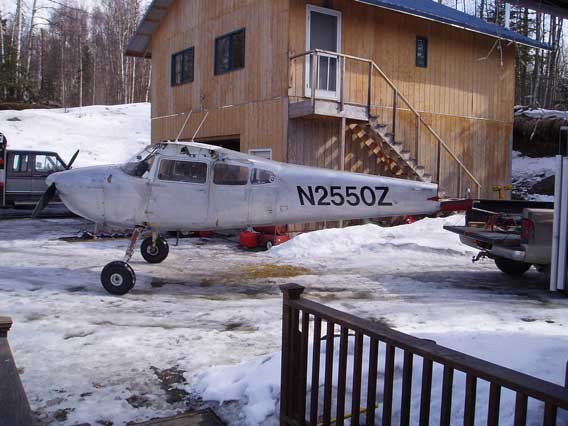
Cessna 185-B Skywagon
N2550Z
SN#1850550
Rohn Ck Pt Iditarod
Fairbanks
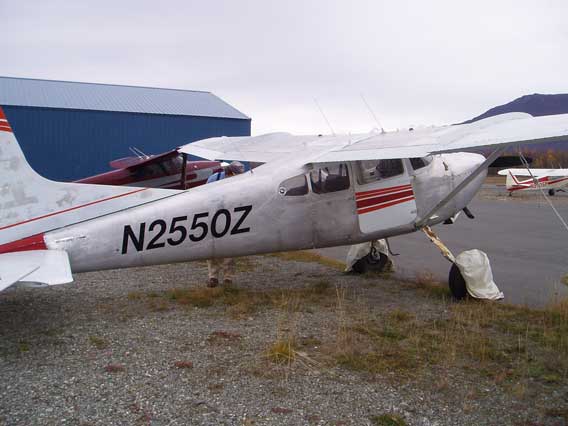
Tri-Star Aviation an FAR 135 1992 to 2014
N2550Z is no longer with us. Great memories rebuilding and flying around the US and Alaska
About Us - Iditarod -Iditarod Airforce - Atlas Air - Skywagon - On The Wing - Feedback - Josh&John
This page chronicles the restoration of an Alaskan work horse:
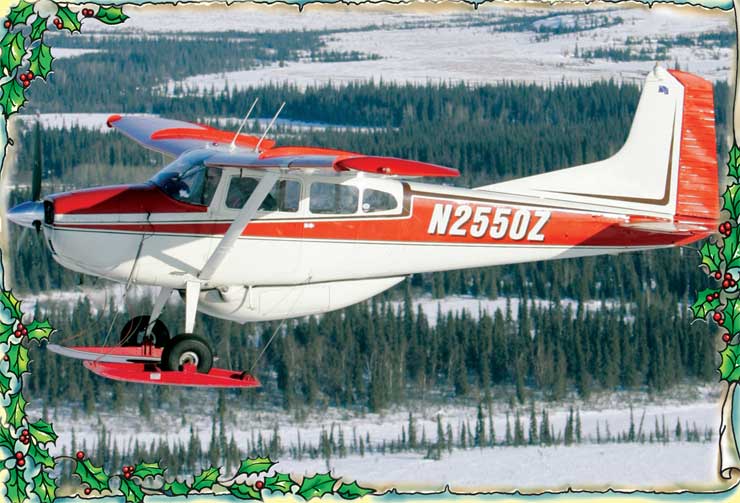 N2550Z Trade-a-Plane cover
photo Dec 2007
N2550Z Trade-a-Plane cover
photo Dec 2007
 I'm a flying
project Paint me!
I'm a flying
project Paint me!
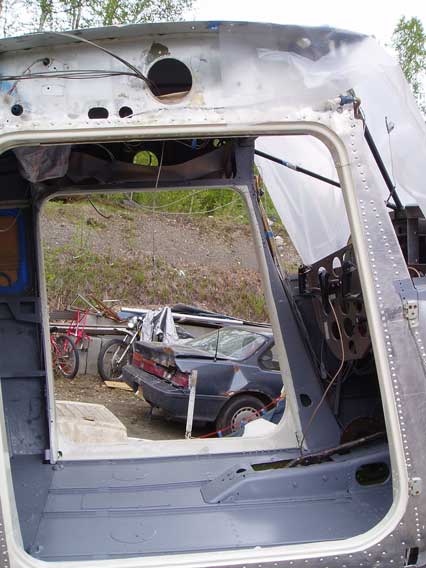
 Wings off, time to go to work.
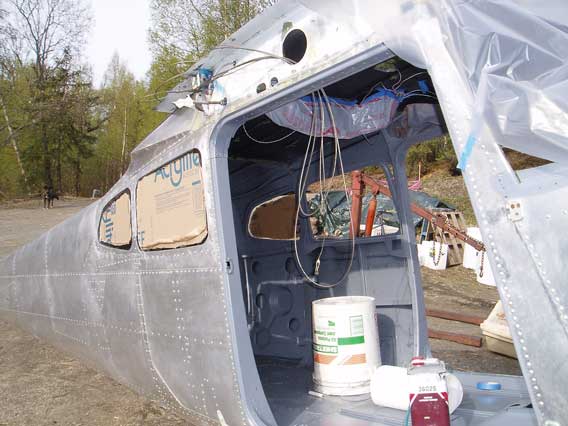 Going together, notice new windows
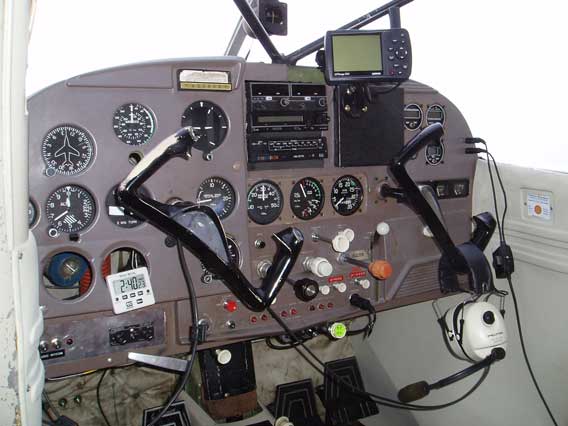 A work in progress Radios are installed
padded dash not in yet
A work in progress Radios are installed
padded dash not in yet
 Interior primed DuPont DP50
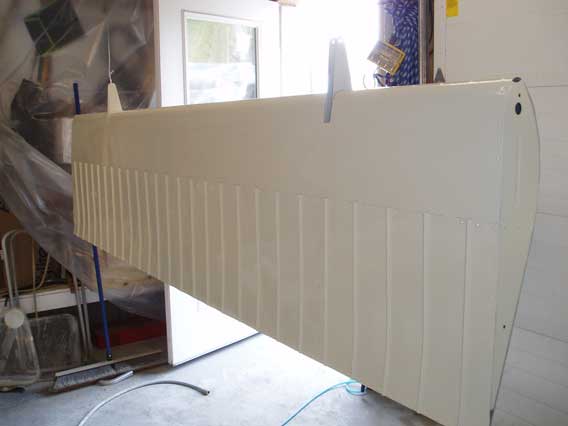 Flap
Flap
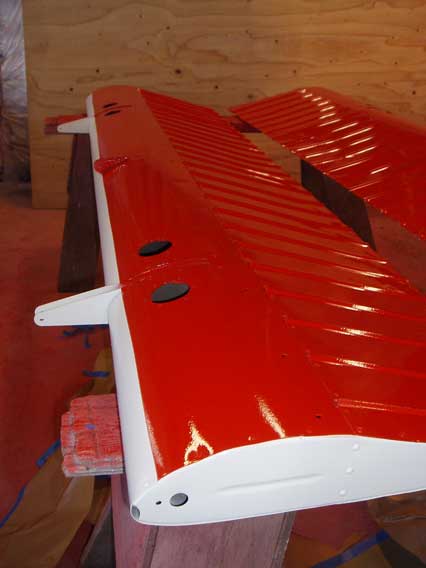 Wings and control surface
Burnt Orange/White
Wings and control surface
Burnt Orange/White
 Painting screws and washers
 Going together
 Finish N-Number shadow blocked
Belly Pod installed
Finish N-Number shadow blocked
Belly Pod installed
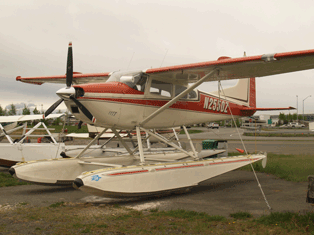
 Married to
EDO 2960 floats
Married to
EDO 2960 floats
 The beginning
It's never Finished
The beginning
It's never FinishedI planned the restoration in 5 phases.
1. Outline; What will it look like and what modifications do we want. 2. Disassembly. 3. Stripping and Cleaning. 4. Repair and modifications. 5. Prep and Paint. 6. Assembly. 7. IO-520 upgrade. 8. EDO 2960 Floats, recondition.
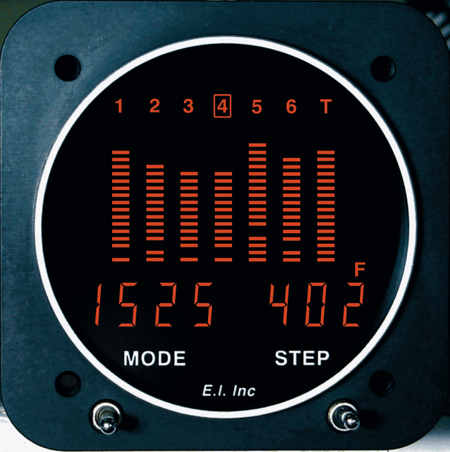
Electronics International UBG-16

 Alaska Skycraft Fuel/Cargo pod
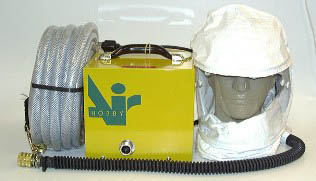
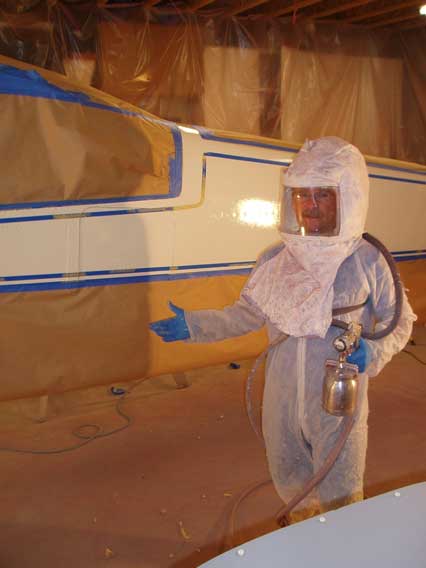
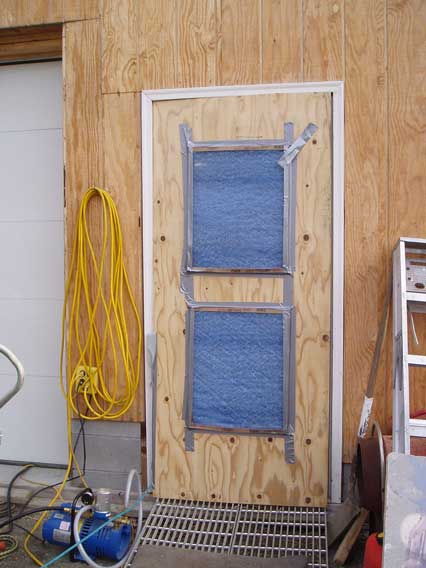 Respirator HVLP
Geared Up
The Filter
Best taken in
stages, fuselage, wings then controls surfaces. Once again you gear up to
protect from chemical exposure. Alumi-Prep is applied then scrubbed with medium
Scotch-Brite to remove oxidized aluminum, dirt and oils. Clean with lots of
water to remove all cleaner. Alodine is then scrubbed on with Scotch-Brite. This
helps to inhibit corrosion propagation under paint. Rinse again with water. From
now till final painting I'm careful to handle parts only when wearing clean gloves.
Any oils from your hands will contaminate surface. I let dry overnight, tack-cloth then prime
with DP50.
I'm careful to
cover and keep cleaned primed wings, fuselage, controls, ect.
Paint: I used
DuPont Imron paint, it's extremely durable. 4775 White, 7455 Burnt Orange and
7502 Brown. We liked the combination of colors and the Orange we felt not only
looked good but was bright enough to help with visibility and collision
avoidance.
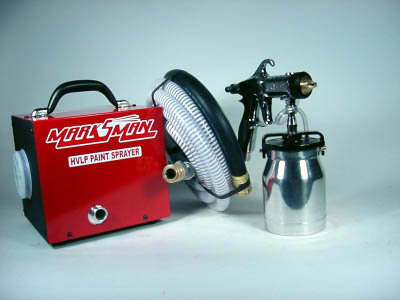
My weapon of
choice for shooting Imron is an HVLP. They deliver paint with warm high volume
air and produce very little overspray. It's a very easy system to master. Imron
is also a very toxic paint and my environment of choice is a full hood fresh air
respirator system. This brings fresh air from outside and is a must for any
painting. I hang a curtin of poly-sheeting around my painting area to keep all
overspray out of my shop area, using an exhaust fan at one end and a plywood
panel in the door opening at the other end with filters installed to reduce dust.
In stages, wings
first. I set up parts to be painted, mix paint, tack-cloth wipe, gear up in
tyvek suite, turn everything on and paint! I like to work the trap corners and
hard angles till covered.
Then I shoot a thin transparent coat in one direction,
a second thin coat in the other direction and after about 10 minutes a final
fill coat.
You can see when the paint fills, the texture is uniform and there is
a finish sheen. It's a find line and takes a practiced eye, if you cross it
you'll get sags and runs. Sags are bad, a whole layer of paint slides and I
don't have a good fix.
Runs can be fixed. I use a strip of masking tape, be
quick. While the paint is flowing apply tape and remove run, re-shoot a light
coat and hopefully you will have a seamless repair. I shot everything that was
being painted white first, including a cardboard box covered with all the
exterior screws and washers I would need.
Respirator HVLP
Geared Up
The Filter
Best taken in
stages, fuselage, wings then controls surfaces. Once again you gear up to
protect from chemical exposure. Alumi-Prep is applied then scrubbed with medium
Scotch-Brite to remove oxidized aluminum, dirt and oils. Clean with lots of
water to remove all cleaner. Alodine is then scrubbed on with Scotch-Brite. This
helps to inhibit corrosion propagation under paint. Rinse again with water. From
now till final painting I'm careful to handle parts only when wearing clean gloves.
Any oils from your hands will contaminate surface. I let dry overnight, tack-cloth then prime
with DP50.
I'm careful to
cover and keep cleaned primed wings, fuselage, controls, ect.
Paint: I used
DuPont Imron paint, it's extremely durable. 4775 White, 7455 Burnt Orange and
7502 Brown. We liked the combination of colors and the Orange we felt not only
looked good but was bright enough to help with visibility and collision
avoidance.
My weapon of
choice for shooting Imron is an HVLP. They deliver paint with warm high volume
air and produce very little overspray. It's a very easy system to master. Imron
is also a very toxic paint and my environment of choice is a full hood fresh air
respirator system. This brings fresh air from outside and is a must for any
painting. I hang a curtin of poly-sheeting around my painting area to keep all
overspray out of my shop area, using an exhaust fan at one end and a plywood
panel in the door opening at the other end with filters installed to reduce dust.
In stages, wings
first. I set up parts to be painted, mix paint, tack-cloth wipe, gear up in
tyvek suite, turn everything on and paint! I like to work the trap corners and
hard angles till covered.
Then I shoot a thin transparent coat in one direction,
a second thin coat in the other direction and after about 10 minutes a final
fill coat.
You can see when the paint fills, the texture is uniform and there is
a finish sheen. It's a find line and takes a practiced eye, if you cross it
you'll get sags and runs. Sags are bad, a whole layer of paint slides and I
don't have a good fix.
Runs can be fixed. I use a strip of masking tape, be
quick. While the paint is flowing apply tape and remove run, re-shoot a light
coat and hopefully you will have a seamless repair. I shot everything that was
being painted white first, including a cardboard box covered with all the
exterior screws and washers I would need.
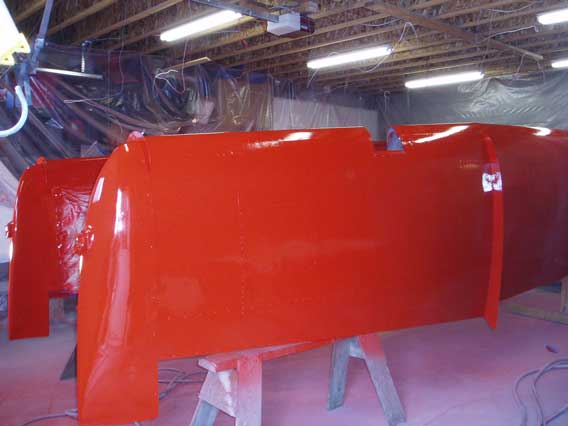
 The wings 1st coat
Finished Ailerons
Three color finished wing
Laying out the
color pattern with fine-line tape took a full day. We took a lot of time to get
it looking uniform and straight. After masking all areas not taking color from
getting overspray I shoot another coat of white on the areas taking color. This
is a really easy and fool proof way to seal the fine-line tape and it totally
prevents the other colors from bleeding in to the white. Shooting the color is
as easy as it gets. I pull the fine-line tape while the last coat is setting up.
You have to be really careful, it's easy to screw up the wet paint but if your
successful the line edges soften and I think it produces a better finished edge.
After 3 days, 2
1/2 gallons of primer 3 1/2 white, 2 orange and 2 quarts of brown it was
finished, my best paint project yet. No sag, two small runs and only two edge
bleeds and I "didn't" kick the paint pot over once.
N-numbers were
easy. We went with Mylar peal and stick, white with brown shadow block, a great
finish from Wes at Warning light of Alaska
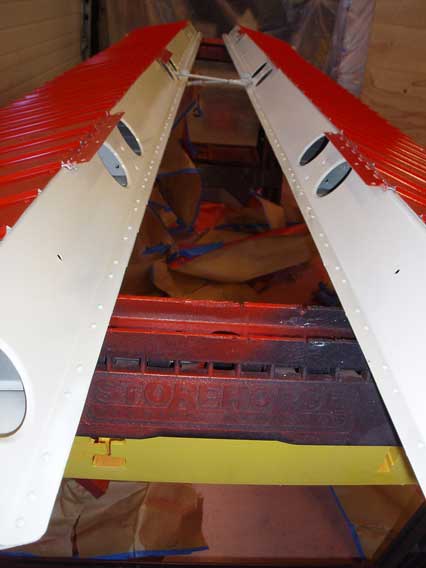
6. Assembly:
One week before we were to depart for Oshkosh we hung the wings and began the
final assembly. Horizontal and vertical stab and all control surfaces mounted.
Assembled with all new AN hardware. Cables adjusted, rigged, tensioned and all fairings
installed. There are a lot of little thinks and attention to detail is
important, a missed wire or bad connection and something won't work right. This
is where tagging everything during dissemblely pays off. Fuel and electrical connected, no leaks upon fueling,
hooray! Kevin's
Upholstery from Merrill Field Airport installed the headliner. With the
skylights there were some tricky angles. Interior panels were an easy fit and
few odd and ends and interior complete.
Battery in,
fueled and successfully test flew on a Tuesday, no problems at all. Thursday
Diana and I loaded up our camping gear and headed across Canada and the Midwest
for Oshkosh and Air Venture trek 2005.
4.
Modifications (Alaska Sky Pod): The Belly Pod from Alaska SkyCrafters was
delayed for a few months but finely arrived. These pods are a jell-coat
fiberglass construction and form fitted to the contour of the Cessna 180/185
belly. Installation was very straight forward. The pod is mounted to the
aircraft belly using AN-Rivnuts and structural machine screws. It takes some
time centering the pod on the belly and marking the access holes for the fuel
and electric and making sure mounting hole location do not interfere with
aircraft ribs ect. After drilling all holes and ensuring a perfect fit, I
removed the Pod and painted Imron 4775 White, same used for and main aircraft
color. Thus it was mounted freshly painted and not dinged up from installation.
Hooking up the fuel couldn't have been easier. Some installations require
cutting the fuel supply line. The 185 however has a belly fuel drain with AN-T fitting,
this was simply replaced with a AN-Star fitting and the supplied line to the
SkyPod fuel tank was attached to this fitting. Fuel is transferred to the right
wing tank when it's capacity allows, with a DC pump. A 10amp CB was installed
and wired with an operating switch and pump On light on the dash. A gallon of
fuel in the pod and some adjustments and a check for leaks and the Fuel/Cargo
Pod was installed. This extra fuel has extended the endurance range to 8 hours
in some cases. It's long time without a Lav on board.
I'm very
impressed with the quality of these pods, ease of installation and the utility
they add. Other then painting it's an easy 8 hours. Alaska
SkyCrafters
offers two options, all cargo or Cargo/Fuel, (29 gallons).
7. IO-520
modification: It's great being on the home stretch of this restoration
project. During the year and a half Diana and I have been at this, the 185 has been
flyable all but 4 months and this is the last one. We choose the end of October,
there isn't much good flying till after the 1st of the year when lakes and
rivers are frozen solid and the days start getting longer.
Being around
180/185's all my aviation career and seeing the developments, epically the last
10 years, I knew the way we would go in upgrading our 185 from the IO-470 to the
Teledyne Continental Motors IO-520.
We choose the
Kenmore Air STC for mounting the Continental IO-520D and the P-Ponk STC for
hanging the McCauley 3 blade BlackMac prop and polished spinner. The engine will include
the Continental oil filter adapter, New AWI exhaust with seaplane muffler
extension, 6 point EGT/CHT engine analyzer, Quantity/flow fuel analyzer, Interav
Alternator conversion and Tanis preheat system.
There are many
options out there for engine vendors. I spent several months keeping an eye out
for IO-520 deals. It paid off, found a IO-520 from an aircraft mishap, ran out
of gas and engine was stopped on landing but it was short of the runway which
totaled the aircraft. Very low time engine with ECI cylinders.
The wings 1st coat
Finished Ailerons
Three color finished wing
Laying out the
color pattern with fine-line tape took a full day. We took a lot of time to get
it looking uniform and straight. After masking all areas not taking color from
getting overspray I shoot another coat of white on the areas taking color. This
is a really easy and fool proof way to seal the fine-line tape and it totally
prevents the other colors from bleeding in to the white. Shooting the color is
as easy as it gets. I pull the fine-line tape while the last coat is setting up.
You have to be really careful, it's easy to screw up the wet paint but if your
successful the line edges soften and I think it produces a better finished edge.
After 3 days, 2
1/2 gallons of primer 3 1/2 white, 2 orange and 2 quarts of brown it was
finished, my best paint project yet. No sag, two small runs and only two edge
bleeds and I "didn't" kick the paint pot over once.
N-numbers were
easy. We went with Mylar peal and stick, white with brown shadow block, a great
finish from Wes at Warning light of Alaska
6. Assembly:
One week before we were to depart for Oshkosh we hung the wings and began the
final assembly. Horizontal and vertical stab and all control surfaces mounted.
Assembled with all new AN hardware. Cables adjusted, rigged, tensioned and all fairings
installed. There are a lot of little thinks and attention to detail is
important, a missed wire or bad connection and something won't work right. This
is where tagging everything during dissemblely pays off. Fuel and electrical connected, no leaks upon fueling,
hooray! Kevin's
Upholstery from Merrill Field Airport installed the headliner. With the
skylights there were some tricky angles. Interior panels were an easy fit and
few odd and ends and interior complete.
Battery in,
fueled and successfully test flew on a Tuesday, no problems at all. Thursday
Diana and I loaded up our camping gear and headed across Canada and the Midwest
for Oshkosh and Air Venture trek 2005.
4.
Modifications (Alaska Sky Pod): The Belly Pod from Alaska SkyCrafters was
delayed for a few months but finely arrived. These pods are a jell-coat
fiberglass construction and form fitted to the contour of the Cessna 180/185
belly. Installation was very straight forward. The pod is mounted to the
aircraft belly using AN-Rivnuts and structural machine screws. It takes some
time centering the pod on the belly and marking the access holes for the fuel
and electric and making sure mounting hole location do not interfere with
aircraft ribs ect. After drilling all holes and ensuring a perfect fit, I
removed the Pod and painted Imron 4775 White, same used for and main aircraft
color. Thus it was mounted freshly painted and not dinged up from installation.
Hooking up the fuel couldn't have been easier. Some installations require
cutting the fuel supply line. The 185 however has a belly fuel drain with AN-T fitting,
this was simply replaced with a AN-Star fitting and the supplied line to the
SkyPod fuel tank was attached to this fitting. Fuel is transferred to the right
wing tank when it's capacity allows, with a DC pump. A 10amp CB was installed
and wired with an operating switch and pump On light on the dash. A gallon of
fuel in the pod and some adjustments and a check for leaks and the Fuel/Cargo
Pod was installed. This extra fuel has extended the endurance range to 8 hours
in some cases. It's long time without a Lav on board.
I'm very
impressed with the quality of these pods, ease of installation and the utility
they add. Other then painting it's an easy 8 hours. Alaska
SkyCrafters
offers two options, all cargo or Cargo/Fuel, (29 gallons).
7. IO-520
modification: It's great being on the home stretch of this restoration
project. During the year and a half Diana and I have been at this, the 185 has been
flyable all but 4 months and this is the last one. We choose the end of October,
there isn't much good flying till after the 1st of the year when lakes and
rivers are frozen solid and the days start getting longer.
Being around
180/185's all my aviation career and seeing the developments, epically the last
10 years, I knew the way we would go in upgrading our 185 from the IO-470 to the
Teledyne Continental Motors IO-520.
We choose the
Kenmore Air STC for mounting the Continental IO-520D and the P-Ponk STC for
hanging the McCauley 3 blade BlackMac prop and polished spinner. The engine will include
the Continental oil filter adapter, New AWI exhaust with seaplane muffler
extension, 6 point EGT/CHT engine analyzer, Quantity/flow fuel analyzer, Interav
Alternator conversion and Tanis preheat system.
There are many
options out there for engine vendors. I spent several months keeping an eye out
for IO-520 deals. It paid off, found a IO-520 from an aircraft mishap, ran out
of gas and engine was stopped on landing but it was short of the runway which
totaled the aircraft. Very low time engine with ECI cylinders.
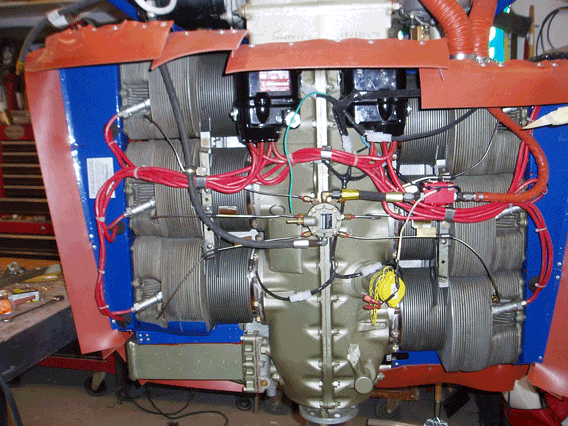
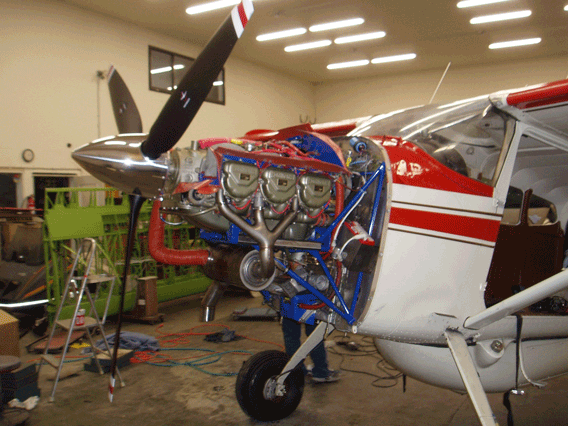
 On engine stand ready to go
Installation complete
First flight, new engine
Removed the old
IO-470 and prop. I'll sell these and recoup some of my cost. Removed throttle,
prop mixture and cowl flap cables and reinstalled new veneer controls. Firewall cleaned,
repainted
and silicone some minor holes. Set up wiring, new hoses and new AN hardware as
required.
Atlee Dodge Aircraft repaired, reconditioned and powder coated the old engine mount for use with the
IO-520. With the engine on a flange stand, installed the engine mounted with new
Lord mounts and built the engine exterior; Baffling, ignition, new AWI exhaust, EGT&
CHT probes, Reiff preheat, Gami injectors, fuel flow and the new electronics. It takes time and planning to
install, route and clamp wires and lines so as not to chaff or interfere and to
comply with the installation requirements. Even then they'll be some changes
after we hang the engine.
It took hours to
remove the IO-470 but it took 2 days to install and rig the IO-520.
8. EDO 2960
Floats: This last phase began in May
2006. Diana and I had planned a month to recondition the EDO floats we picked up
last winter. However they were in such bad shape, taking more time then I
expected, we didn't finish till August. Too late for this summers float season.
On engine stand ready to go
Installation complete
First flight, new engine
Removed the old
IO-470 and prop. I'll sell these and recoup some of my cost. Removed throttle,
prop mixture and cowl flap cables and reinstalled new veneer controls. Firewall cleaned,
repainted
and silicone some minor holes. Set up wiring, new hoses and new AN hardware as
required.
Atlee Dodge Aircraft repaired, reconditioned and powder coated the old engine mount for use with the
IO-520. With the engine on a flange stand, installed the engine mounted with new
Lord mounts and built the engine exterior; Baffling, ignition, new AWI exhaust, EGT&
CHT probes, Reiff preheat, Gami injectors, fuel flow and the new electronics. It takes time and planning to
install, route and clamp wires and lines so as not to chaff or interfere and to
comply with the installation requirements. Even then they'll be some changes
after we hang the engine.
It took hours to
remove the IO-470 but it took 2 days to install and rig the IO-520.
8. EDO 2960
Floats: This last phase began in May
2006. Diana and I had planned a month to recondition the EDO floats we picked up
last winter. However they were in such bad shape, taking more time then I
expected, we didn't finish till August. Too late for this summers float season.
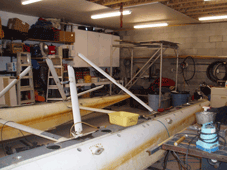
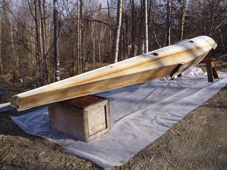
 EDO 2960 before
Ready to strip
Finished
Rigged and ready to float
EDO 2960 before
Ready to strip
Finished
Rigged and ready to float
My approach was the same as with the airframe, dissemble, strip, repair, reassemble and paint. With the EDO aluminum compartments and structure held together with steel hardware living for years in a marine environment, it was no easy task. Most bolts especially the main ones were corroded so bad penetrating oil was not enough to fee them, requiring drilling the bolt itself. Floats were then stripped and the compartments cleaned and pressure washed, removing years of silicone and whatever else was used to seal them. Repaired and replace old patches as needed. Sealing the cleaned compartments I use Randolph fuel tank sealer. I hang each float at it's balance point, pore in some sealer then use a reversed vacuum cleaner and rock the float coating the seams while air pressure forces the sealer into any gaps. works great. After the sealer dries I reapply the air pressure and use soapy water on the outside to check for any leaks. Sealing again as necessary This system works great for getting a good tight float. Re-assembling with new AN hardware I coat all the bolts with fuel lube. Fuel Lube is a pain to work with, sticky and hard to clean, only MEK removes it but it's impervious to fuel or water and it doesn't dry. Really helps with preventing future corrosion. After alidone it's prime with DP-50 and Imron white and a little trim paint, done.
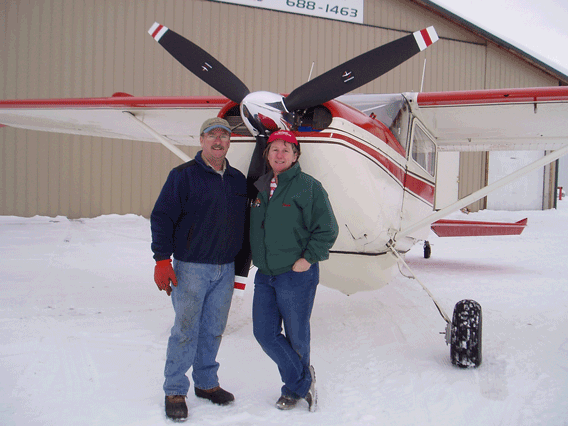
This Cessna 185 has a factory float kit and had previously been on EDO floats so all the interior blocks were in place. May 2007 we married aircraft to floats. Hoisting, removing main gear, tail wheel and capping brake lines. Installing main gear float stubs and rear blocks then bolting the floats in place, attaching and tightening cross brace wires and rigging water rudder and retract cables. Floated May 28, 2007.
Dynon EFIS D10A: To say it's never done is an understatement. With the older flight instruments I decided to upgrade to one instruments has all. The Dynon EFIS D10A instrument has Pitot Attitude, Density Altitude, Pitot Airspeed, True Airspeed, Mag Heading, Vertical Speed, Turn & Bank, Slip indicator and OAT all in one unit and it fits in the standard 3 1/2 instrument hole. Installation is simple, I repositioned the Attitude indicator to an empty hole in the instrument panel and installed the Dynon in it's place. The Dynon has a Laser Ring Gyro and only requires 12 or 24VDC which I connected to a 2amp CB. I split the Pitot and Static lines, installed plastic compression T's and connected to the Dynon for Pitot-Static input. Additional accessories installed in the left outer wing were the temperature sensor and Mag Heading Sensor. Dynon uses Temperature in connection with Pitot-Static to resolve and display Density Altitude and True Airspeed. The Mag Heading Sensor stabilizes the heading indication to Magnetic.
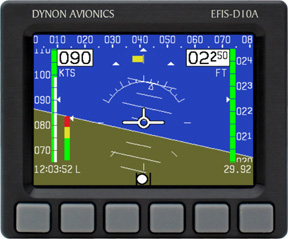

The Dynon unit is not TSO or STC approved and requires a FAA Form 337 for field approval by the FAA. The FAA also has engineering guidelines for the installation of EFIS units (Electronic Flight Instrument Systems) The FAA requires all required Flight Instruments not be removed from the aircraft and placard "VFR ONLY". I have found the Dynon very accurate and a great tool. When you consider the errors these older flight instruments develop and the cost for overhaul or new instruments the Dynon is an economical option.
If your installing an EFIS system in your aircraft here are links to the documents the FAA requires. EFIS Installation guidelines, Flight Manual Supplement and FAA form 337 back page language. Format is MS Word.
The Logbooks: Regardless of an Oil Change, Annual Inspection or Restoration the FAA requires a record of all work preformed and return to service release. STC's, FAA form 337's and LogBook entries: Here is a comprehensive list of the STC and field approvals I used. Most of the modifications were installed under FAA Supplemental Type Data Certificate, commonly known as STC. These are issued from FAA engineering to the manufacturing vendor after meeting stringent design, engineering and testing requirements. Each STC has it's own set of instructions or procedures. Sometimes various options are available to comply with these instructions. FAA Advisory Circular 43.13 has additional guidelines and practices which must also be consulted and complied with. Modifications not covered under an STC were installed under a Field Approval by the FAA, a onetime installation verified and approved by a local FAA maintenance inspector. Cee Baileys Windshield CEE Baileys STC SA5451NM Alaska SkyPod, Alaska SkyCrafters STC
SA02179AK
Alaska SkyPod, Alaska SkyCrafters STC
SA02179AK
 FP-5, Electronics International STC SA00068SE
UBG-16, Electronics International STC SA0068SE
FP-5, Electronics International STC SA00068SE
UBG-16, Electronics International STC SA0068SE
 Folding removable Jump Seats SA 02008 AK